본문
[Gitlab] Gitlab Runner 설치하기
프로그래밍/CICD 2025. 12. 18. 21:14
✅ 1단계: GitLab Runner 바이너리 다운로드
EC2 호스트에서 실행 (GitLab 컨테이너 외부)
# GitLab Runner 바이너리 다운로드
sudo curl -L --output /usr/local/bin/gitlab-runner \\
  "<https://gitlab-runner-downloads.s3.amazonaws.com/latest/binaries/gitlab-runner-linux-amd64>"

# 실행 권한 부여
sudo chmod +x /usr/local/bin/gitlab-runner

# 설치 확인
gitlab-runner --version
✅ 2단계: GitLab Runner 사용자 생성
# gitlab-runner 사용자 생성
sudo useradd --comment 'GitLab Runner' --create-home gitlab-runner --shell /bin/bash

# Docker 그룹에 추가 (Docker 사용을 위해)
sudo usermod -aG docker gitlab-runner

# gitlab-runner 사용자로 전환해서 테스트
sudo -u gitlab-runner docker ps
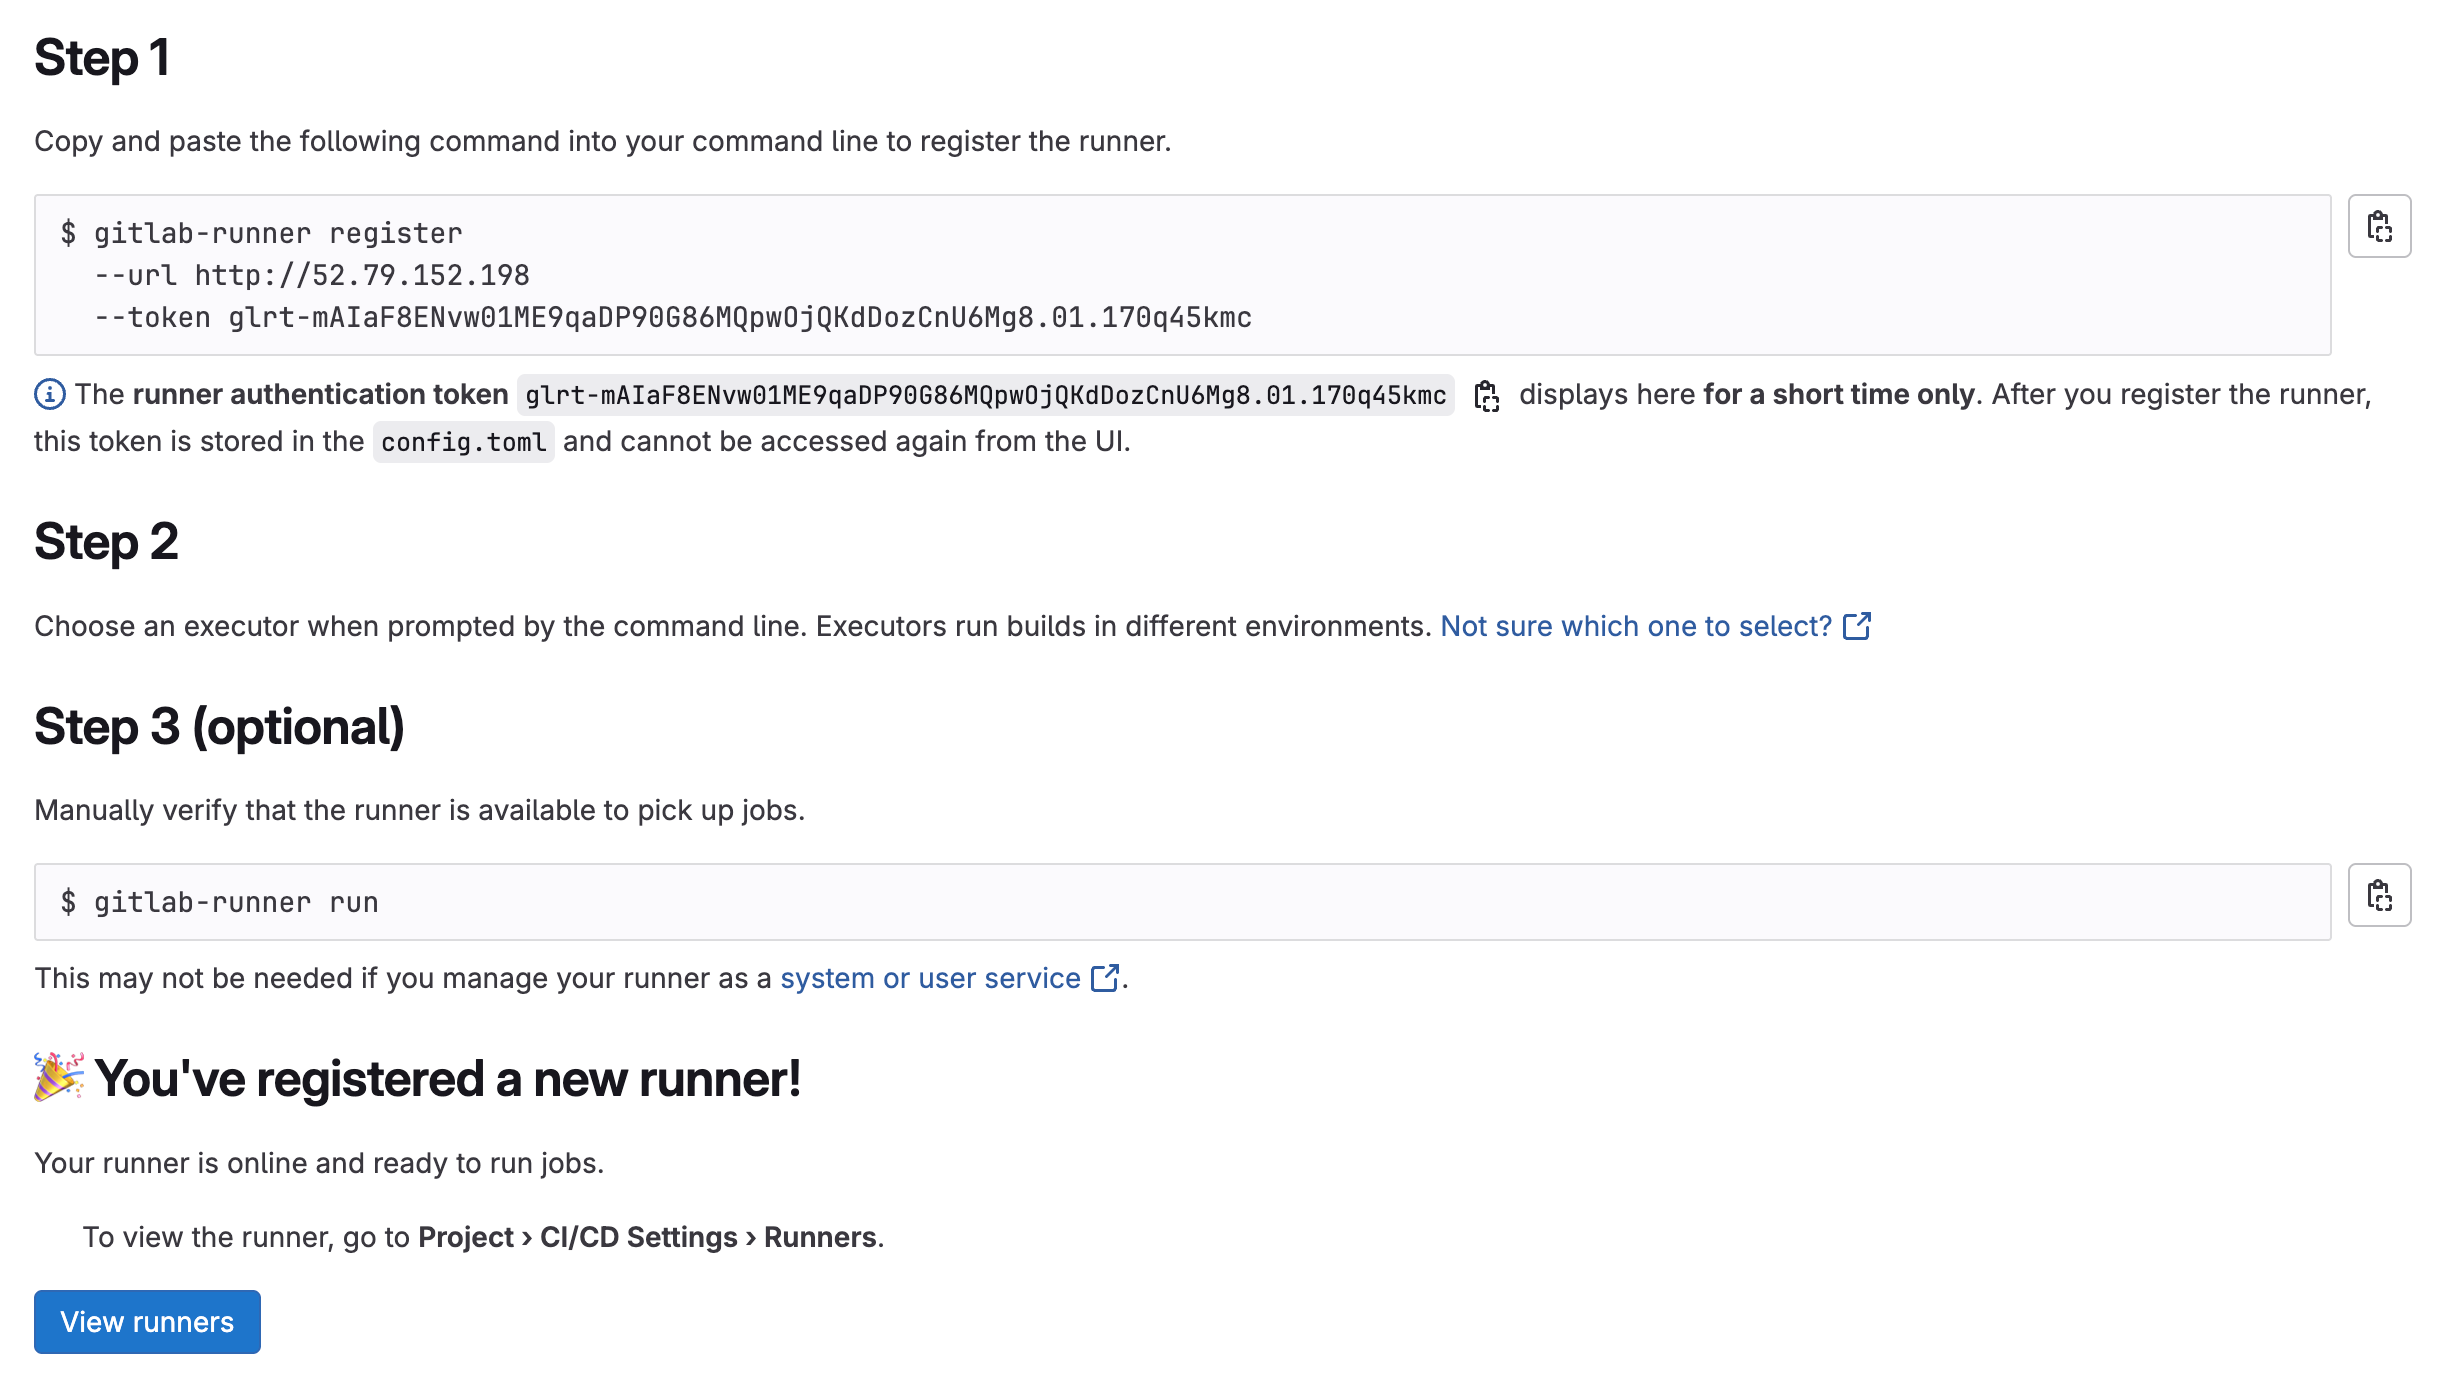
✅ 3단계: GitLab에서 Runner 토큰 확인
GitLab 웹 인터페이스에서:
1. bedrock-balancer 프로젝트 접속
2. Settings → CI/CD 메뉴
3. Runners 섹션 펼치기
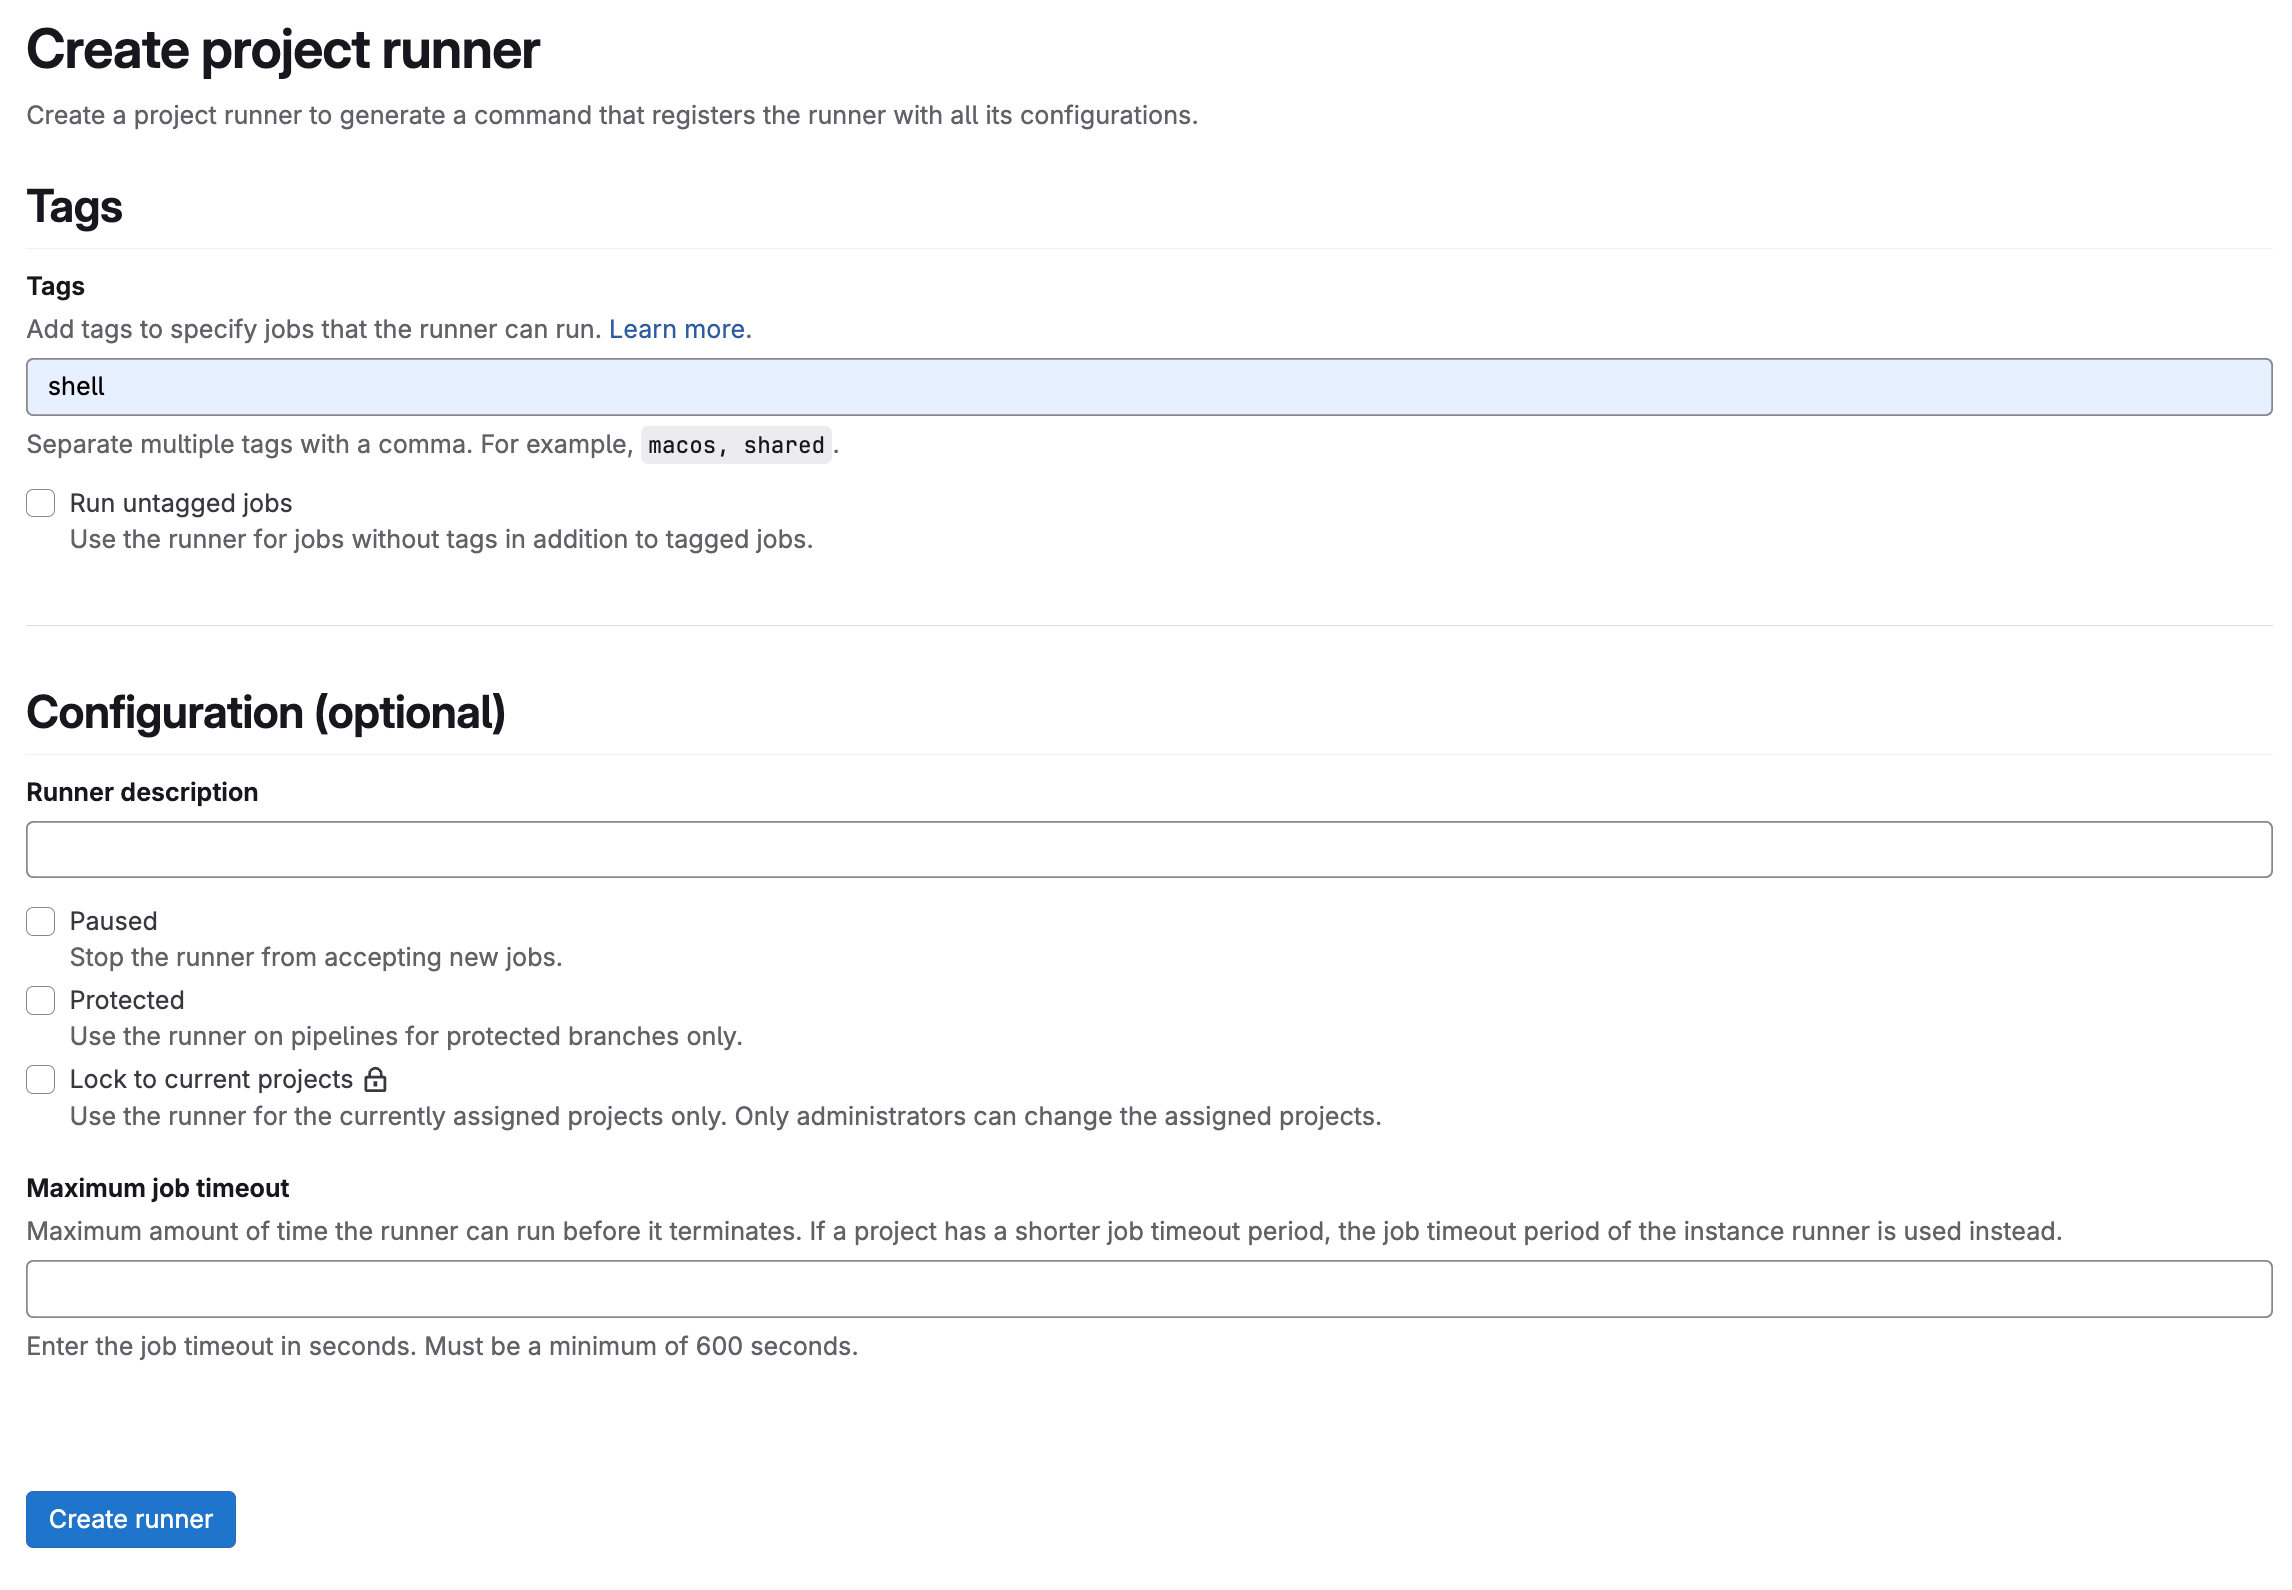
4. "Create project runner" 클릭
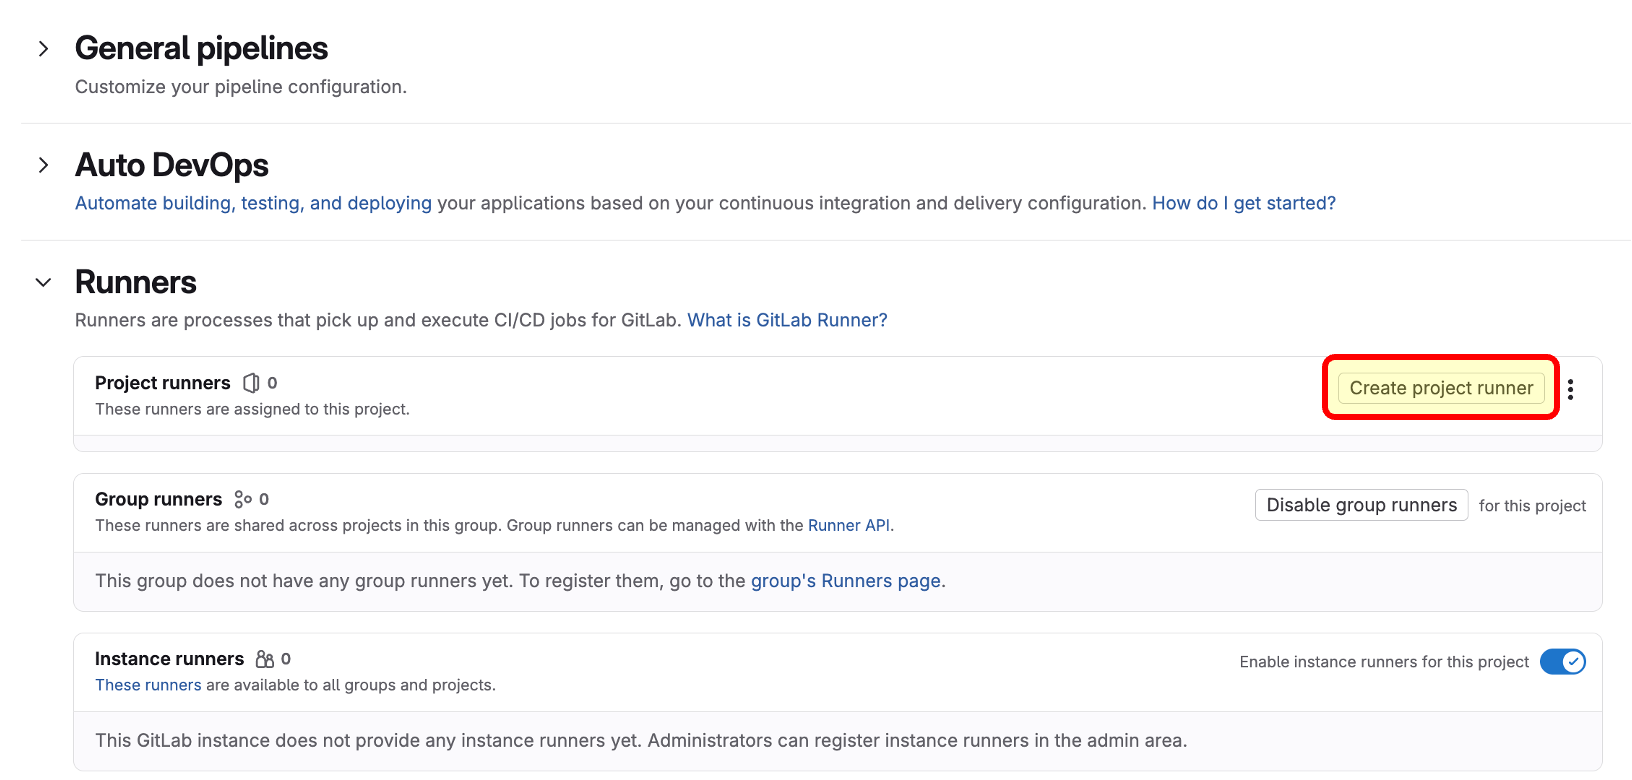
5. Step 1의 Registration token 복사
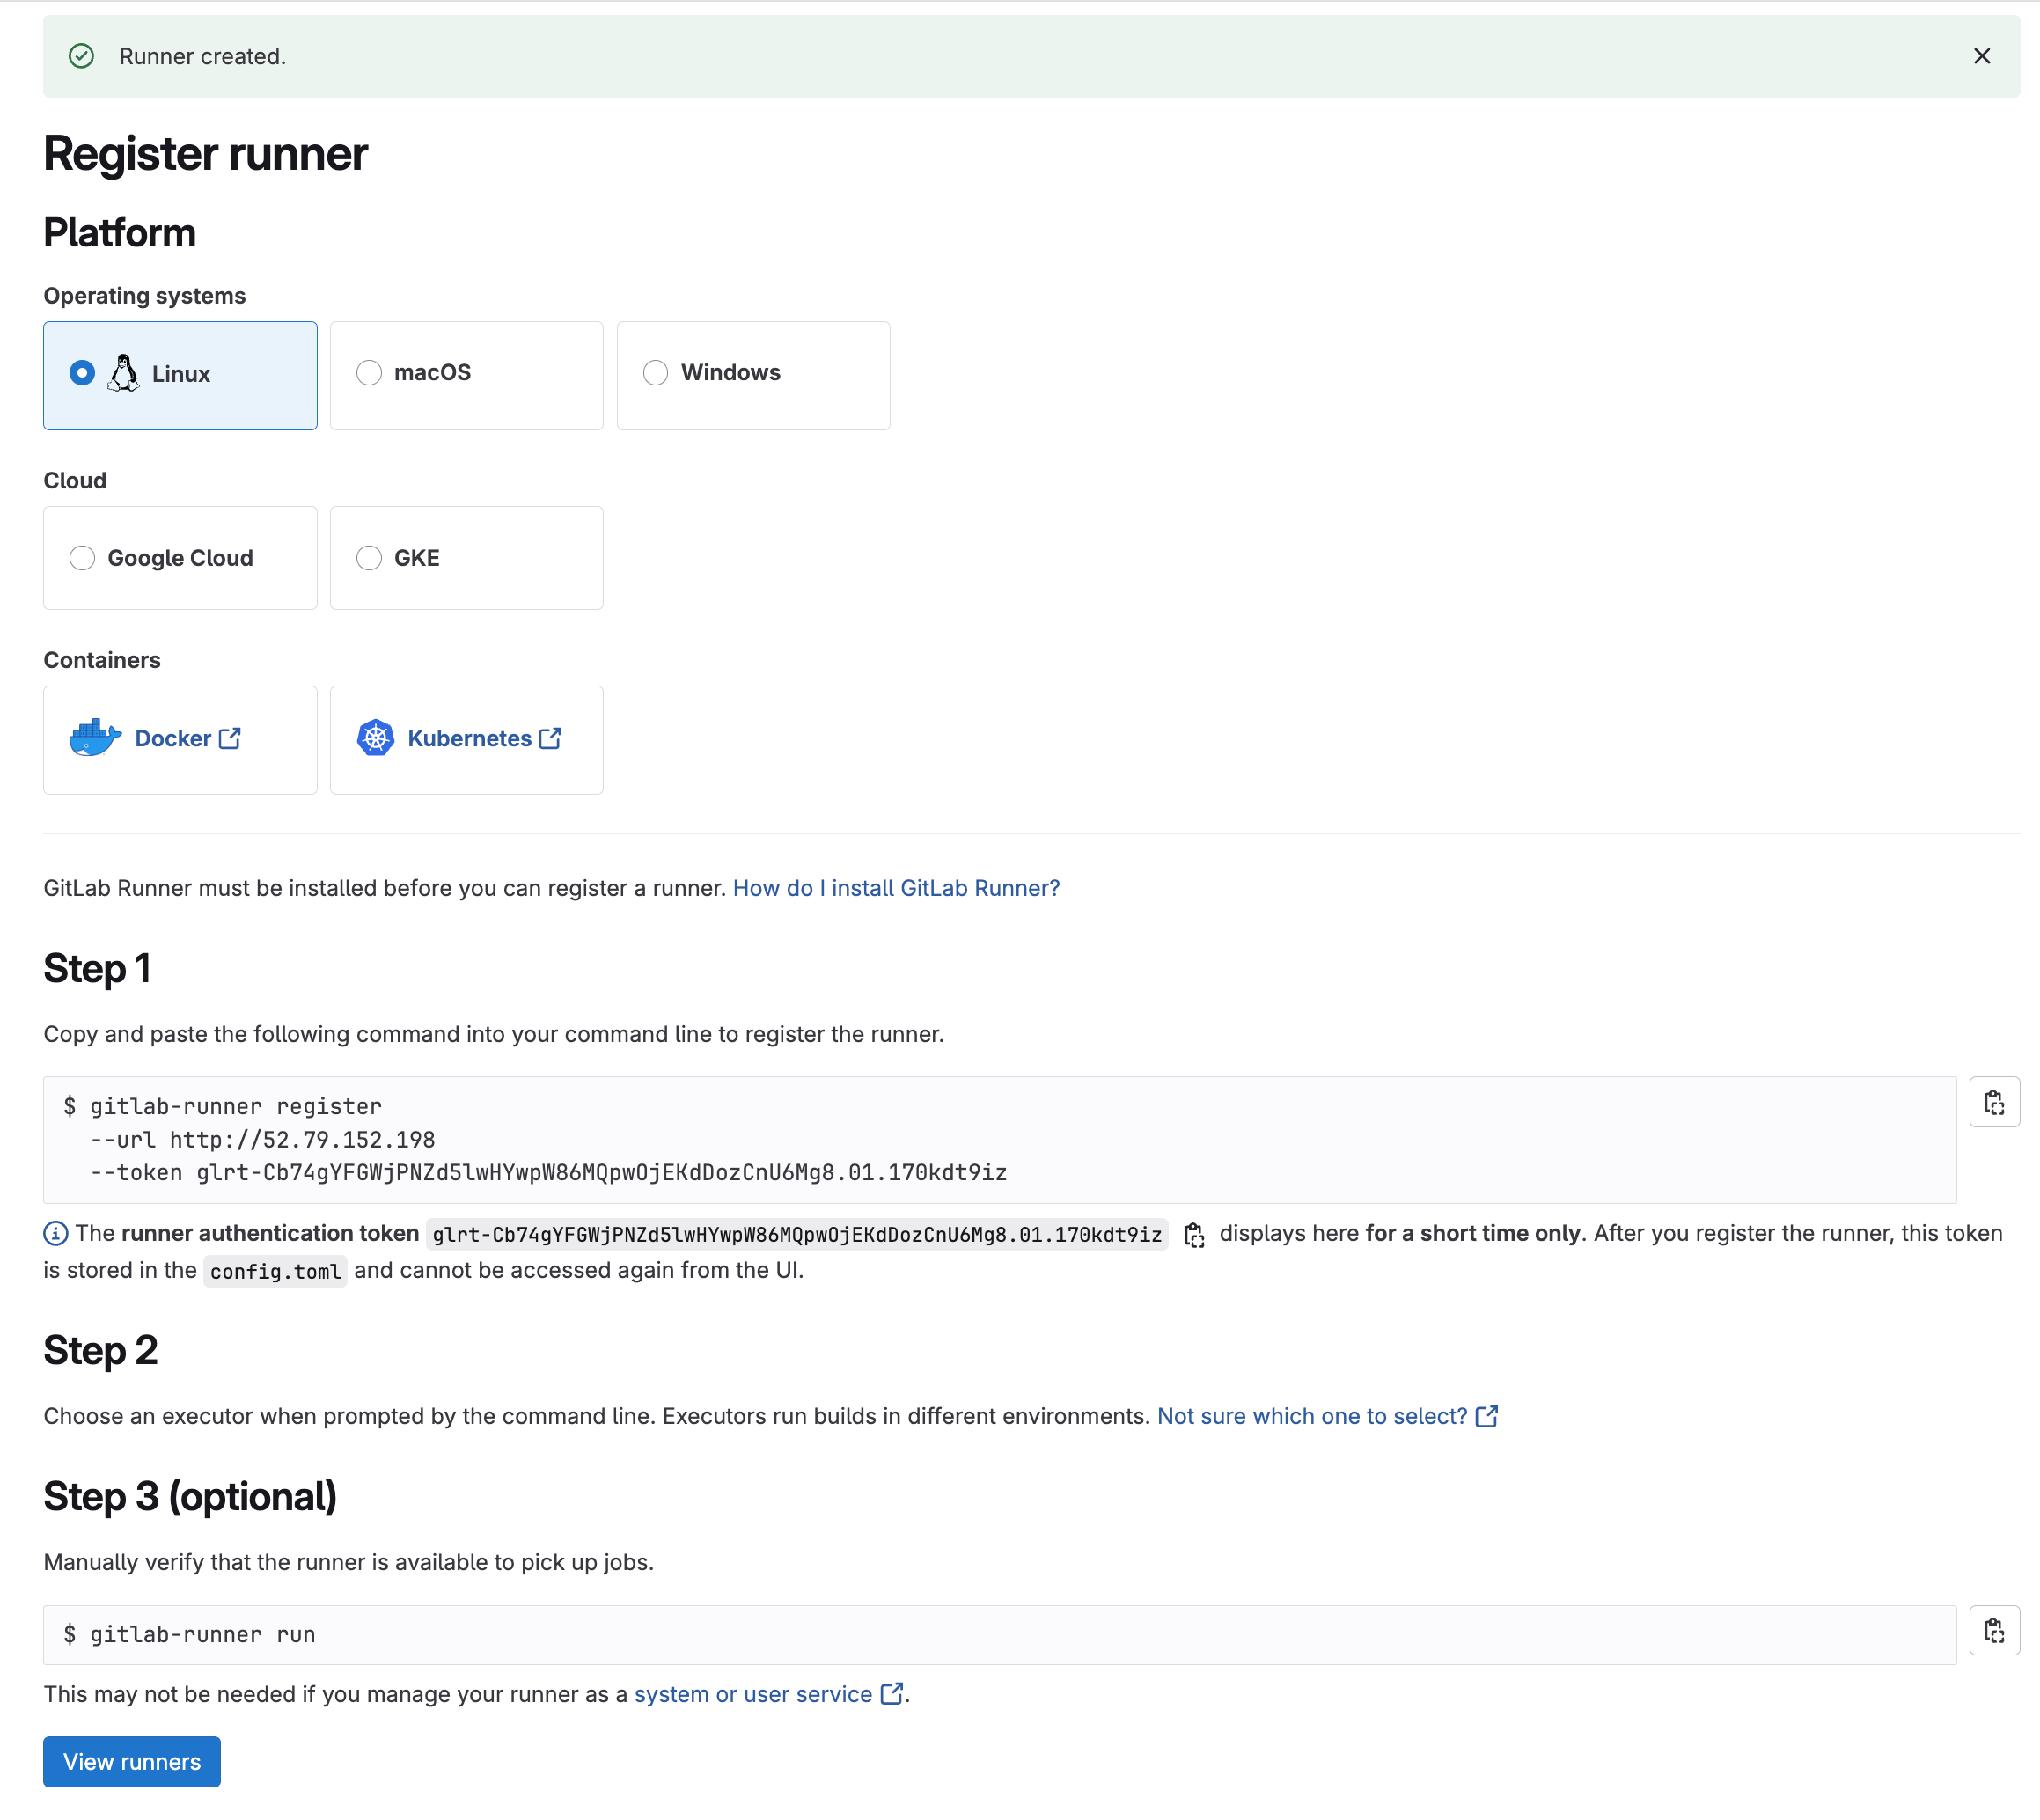
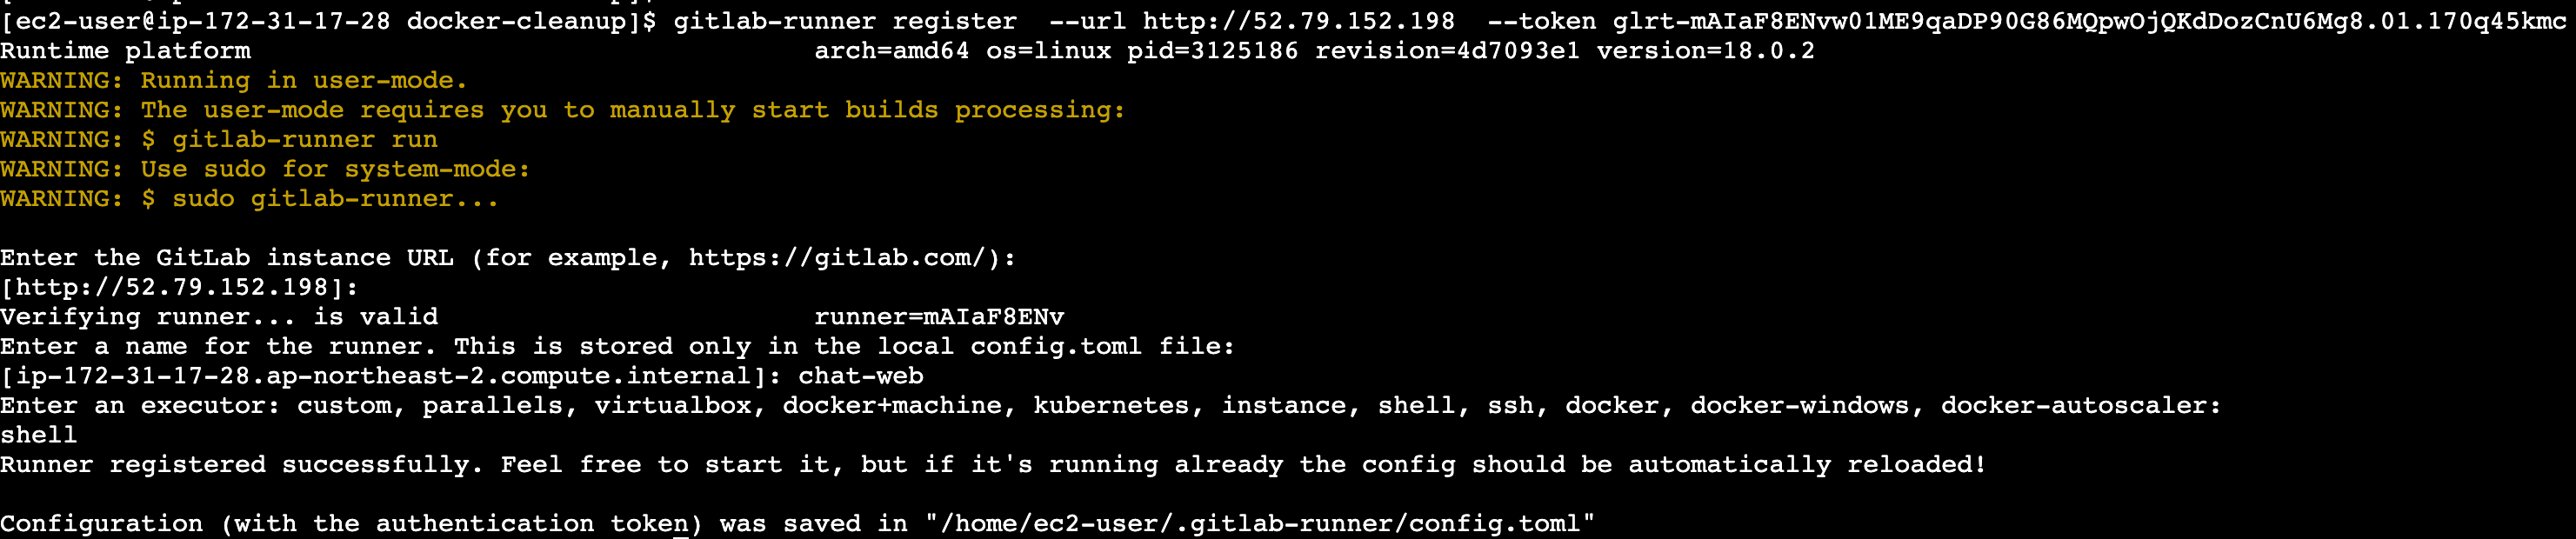
✅ 4단계: GitLab Runner 등록 (service-runner)
### bedrock-balance
sudo gitlab-runner register \
  --non-interactive \
  --url "http://52.79.152.198" \
  --registration-token "glrt-s1jIMNgXWs0bxjgBY2ehzG86MQpwOjEKdDozCnU6Mg8.01.170tfq9jc" \
  --executor "shell" \
  --description "service-runner" \
  --tag-list "shell,docker,service" \
  --run-untagged="true"


### insight-gen-ui
gitlab-runner register  --url http://52.79.152.198  --token glrt-3L2DM3Dl5r91qymSQWTzZW86MQpwOjUKdDozCnU6Mg8.01.171t43ezy


### vega-renderer
gitlab-runner register  --url http://52.79.152.198  --token glrt-iONX51oKhMALjB6oAPS-em86MQpwOjYKdDozCnU6Mg8.01.170qaru4x


### chat-web
gitlab-runner register  --url http://52.79.152.198  --token glrt-3g1ZhxlwOgDRrMVs2vp8q286MQpwOjcKdDozCnU6Mg8.01.171jxa0vb


### chat-was
gitlab-runner register  --url http://52.79.152.198  --token glrt-eAyl2tUbnJMzbku-CXrVa286MQpwOjcKdDozCnU6Mg8.01.170opwaxx


### common
gitlab-runner run
# 서비스 설정
sudo gitlab-runner install --user=gitlab-runner

# 서비스 시작
sudo gitlab-runner start

# 부팅 시 자동 시작 설정
sudo systemctl enable gitlab-runner
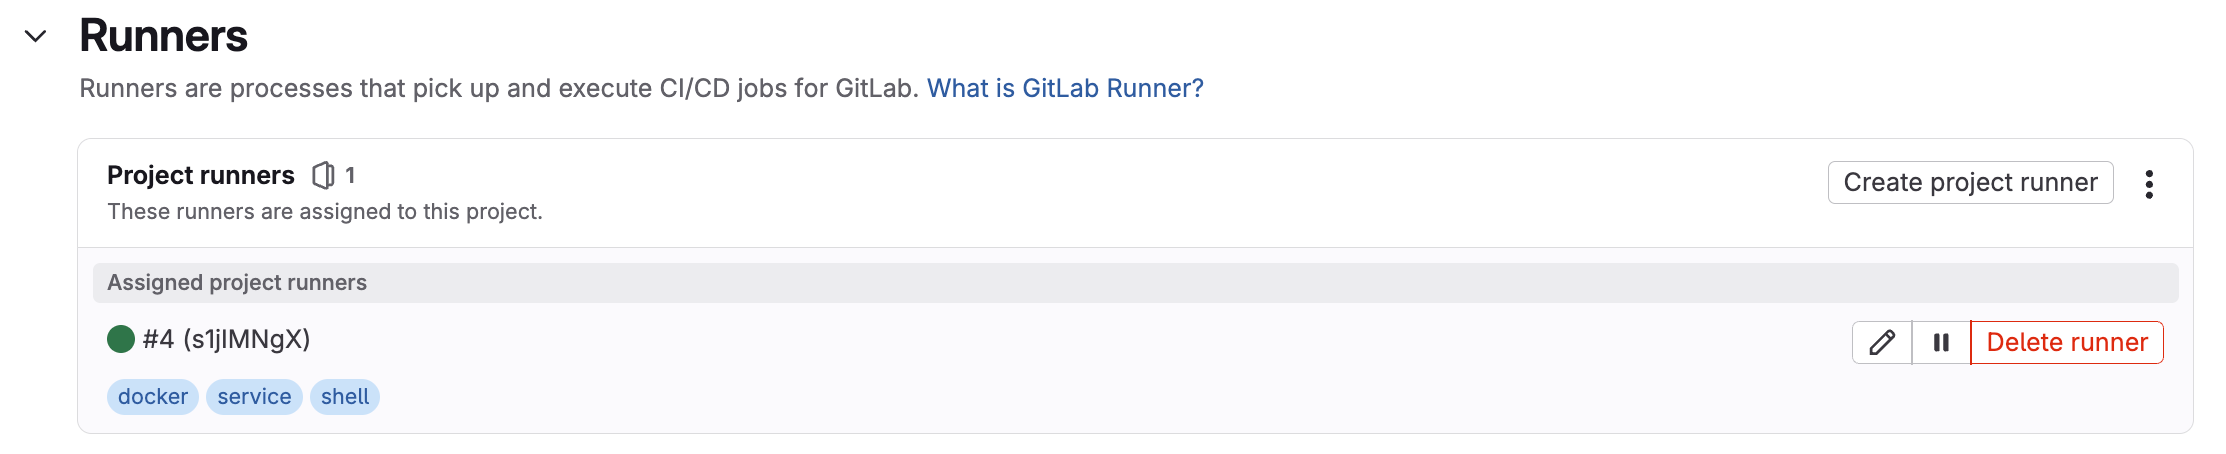
GitLab UI에서 확인:
- Settings → CI/CD → Runners
- Available specific runners 섹션에서 새로 등록된 Runner 확인
- 초록색 상태이면 정상 연결됨
✅ 5단계: .gitlab-ci.yml 파일 등록
.gitlab-ci.yml (샘플코드)
stages:
  - build
  - deploy-dev

variables:
  # 공통 설정
  GIT_CLEAN_FLAGS: "-ffdx"
  GIT_SUBMODULE_STRATEGY: "none"
  DOCKER_BUILDKIT: "1"

# =============================================================================
# BUILD STAGE - DEV 환경용 빌드
# =============================================================================
build_dev:
  stage: build
  before_script:
    - echo "Setting up AWS credentials for DEV build"
    - aws configure set aws_access_key_id "$DEV_AWS_ACCESS_KEY"
    - aws configure set aws_secret_access_key "$DEV_AWS_SECRET_KEY"
    - aws configure set region ap-northeast-2
    - aws configure set output json
    - echo "Testing AWS credentials"
    - aws sts get-caller-identity
    - echo "Environment Check"
    - echo "Current directory $(pwd)"
    - echo "File listing"
    - ls -la
    - echo "App directory"
    - ls -la app/ || echo "app directory not found"
    - echo "Requirements.txt content"
    - cat requirements.txt || echo "requirements.txt not found"
    - echo "Git clean and reset"
    - git clean -ffdx
    - git reset --hard HEAD
  script:
    - echo "Building bedrock-balancer for DEV environment"
    - echo "Commit $CI_COMMIT_SHA"
    - echo "Pipeline $CI_PIPELINE_ID"
    - echo "ECR Login for DEV"
    - aws ecr get-login-password --region ap-northeast-2 | docker login --username AWS --password-stdin $DEV_ECR_REGISTRY
    - echo "Pulling base image"
    - docker pull $DEV_ECR_REGISTRY/python311-slim
    - rm -f Dockerfile.dev
    - |
      cat > Dockerfile.dev << EOF
      FROM $DEV_ECR_REGISTRY/python311-slim
      WORKDIR /app
      ENV PYTHONPATH=/app
      ENV ENVIRONMENT=development

      # curl 설치 (헬스체크용)
      RUN apt-get update && apt-get install -y curl && rm -rf /var/lib/apt/lists/*

      COPY requirements.txt .
      RUN pip install --no-cache-dir -r requirements.txt

      COPY app/ ./app/

      EXPOSE 500

      # 헬스체크 설정 - Task Definition과 동일하게
      HEALTHCHECK --interval=30s --timeout=5s --start-period=60s --retries=3 \
          CMD curl -f http://localhost:500/bedrock-balancer/ || exit 1

      CMD ["uvicorn", "app.main:app", "--host", "0.0.0.0", "--port", "500"]
      EOF
    - COMMIT_SHORT=$(echo $CI_COMMIT_SHA | cut -c1-8)
    - echo "Building Docker image with commit $COMMIT_SHORT"
    - docker build --no-cache --pull -f Dockerfile.dev -t $DEV_ECR_REGISTRY/$DEV_ECR_BB:latest .
    - docker tag $DEV_ECR_REGISTRY/$DEV_ECR_BB:latest $DEV_ECR_REGISTRY/$DEV_ECR_BB:dev-$COMMIT_SHORT
    - echo "Pushing DEV images to ECR"
    - docker push $DEV_ECR_REGISTRY/$DEV_ECR_BB:latest
    - docker push $DEV_ECR_REGISTRY/$DEV_ECR_BB:dev-$COMMIT_SHORT
    - echo "DEV build completed with latest tag and backup tag dev-$COMMIT_SHORT"
  after_script:
    - echo "Cleanup after DEV build"
    - docker system prune -f --volumes || true
    - rm -f Dockerfile.dev || true
    - rm -rf ~/.aws/credentials || true
  only:
    - develop
  tags:
    - shell


# =============================================================================
# DEPLOY STAGE - DEV 환경 배포
# =============================================================================
deploy_dev:
  stage: deploy-dev
  before_script:
    - echo "Setting up AWS credentials for DEV deployment"
    - aws configure set aws_access_key_id "$DEV_AWS_ACCESS_KEY"
    - aws configure set aws_secret_access_key "$DEV_AWS_SECRET_KEY"
    - aws configure set region ap-northeast-2
    - aws configure set output json
    - echo "Testing AWS credentials"
    - aws sts get-caller-identity
    - echo "DEV Deployment Check"
    - echo "ECS Cluster $DEV_ECS_CLUSTER"
    - echo "ECS Service $DEV_ECS_BB"
  script:
    - echo "Deploying to DEV environment with latest image"
    - echo "Image will be pulled from ECR with :latest tag"
    - echo "Checking current service status before deployment..."
    - |
      SERVICE_STATUS=$(aws ecs describe-services --cluster $DEV_ECS_CLUSTER --services $DEV_ECS_BB --query 'services[0].status' --output text 2>/dev/null || echo "NOT_FOUND")
      echo "Current service status: $SERVICE_STATUS"

      if [ "$SERVICE_STATUS" = "ACTIVE" ]; then
        echo "Service is ACTIVE, proceeding with update..."
        aws ecs update-service --cluster $DEV_ECS_CLUSTER --service $DEV_ECS_BB --force-new-deployment --no-cli-pager
      elif [ "$SERVICE_STATUS" = "NOT_FOUND" ]; then
        echo "Service not found, may need to be created manually"
        exit 1
      else
        echo "Service status is $SERVICE_STATUS, forcing deployment..."
        aws ecs update-service --cluster $DEV_ECS_CLUSTER --service $DEV_ECS_BB --force-new-deployment --no-cli-pager
      fi
    - echo "DEV deployment initiated"
    - echo "Waiting for deployment to stabilize (this may take several minutes)..."
    - aws ecs wait services-stable --cluster $DEV_ECS_CLUSTER --services $DEV_ECS_BB
    - echo "Checking DEV deployment status"
    - aws ecs describe-services --cluster $DEV_ECS_CLUSTER --services $DEV_ECS_BB --query 'services[0].{Status:status,Running:runningCount,Desired:desiredCount,TaskDefinition:taskDefinition}' --output table
    - echo "Listing DEV running tasks with health status"
    - |
      TASK_ARNS=$(aws ecs list-tasks --cluster $DEV_ECS_CLUSTER --service-name $DEV_ECS_BB --query 'taskArns[*]' --output text)
      if [ ! -z "$TASK_ARNS" ]; then
        aws ecs describe-tasks --cluster $DEV_ECS_CLUSTER --tasks $TASK_ARNS --query 'tasks[*].{TaskArn:taskArn,LastStatus:lastStatus,HealthStatus:healthStatus,CreatedAt:createdAt}' --output table
      else
        echo "No running tasks found"
      fi
    - echo "Checking recent deployment events"
    - aws ecs describe-services --cluster $DEV_ECS_CLUSTER --services $DEV_ECS_BB --query 'services[0].events[:5]' --output table
  after_script:
    - echo "Cleanup after DEV deployment"
    - rm -rf ~/.aws/credentials || true
  only:
    - develop
  tags:
    - shell
  when: on_success
  dependencies:
    - build_dev
  environment:
    name: development
    deployment_tier: development
✅ 테스트
gitlab-runner 사용자로 AWS 자격증명 설정
# gitlab-runner 사용자로 전환
sudo su - gitlab-runner

# AWS 자격증명 설정
aws configure
# develop 브랜치에 아무 파일이나 수정
echo "Shell Runner 테스트 $(date)" >> README.md
git add README.md
git commit -m "Shell Runner 테스트"
git push origin develop
✅ 모니터링
- Build > Jobs > 최신 파이프라인 클릭


댓글